在 windows 中安装 cuda
如当前最新版本 cuda_12.8.1_572.61_windows.exe
选择版本:
- 操作系统 Windows
- 架构 x86_64
- 版本 11
- 安装方式 exe (local)
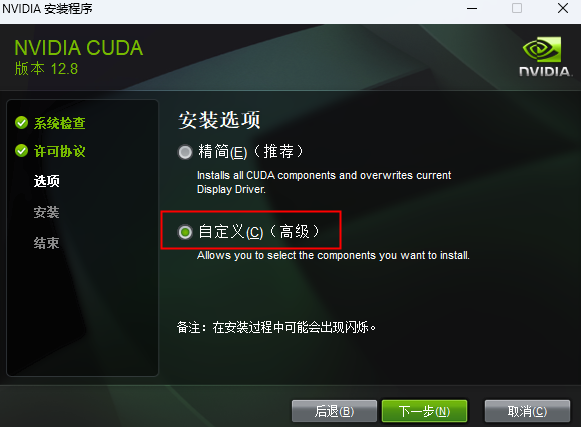
选择自定义。 
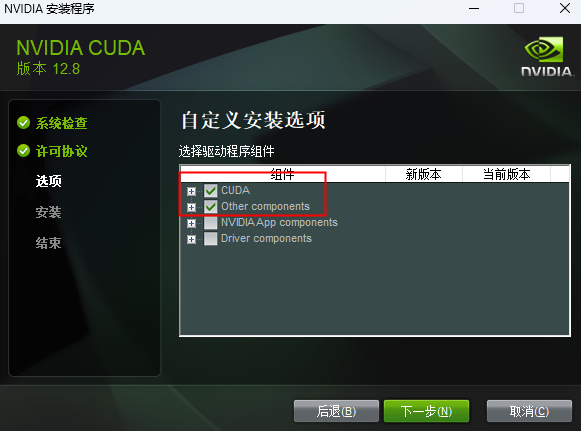
显卡驱动已经有了,不需要勾选。

安装后查看情况
console
PS C:\Users\Administrator> nvcc -V
nvcc: NVIDIA (R) Cuda compiler driver
Copyright (c) 2005-2025 NVIDIA Corporation
Built on Fri_Feb_21_20:42:46_Pacific_Standard_Time_2025
Cuda compilation tools, release 12.8, V12.8.93
Build cuda_12.8.r12.8/compiler.35583870_0console
PS C:\Users\Administrator> nvidia-smi
Sun Mar  9 19:54:16 2025
+-----------------------------------------------------------------------------------------+
| NVIDIA-SMI 572.70                 Driver Version: 572.70         CUDA Version: 12.8     |
|-----------------------------------------+------------------------+----------------------+
| GPU  Name                  Driver-Model | Bus-Id          Disp.A | Volatile Uncorr. ECC |
| Fan  Temp   Perf          Pwr:Usage/Cap |           Memory-Usage | GPU-Util  Compute M. |
|                                         |                        |               MIG M. |
|=========================================+========================+======================|
|   0  NVIDIA GeForce RTX 4090      WDDM  |   00000000:01:00.0  On |                  Off |
|  0%   31C    P8             27W /  480W |     750MiB /  24564MiB |      1%      Default |
|                                         |                        |                  N/A |
+-----------------------------------------+------------------------+----------------------+
|   1  NVIDIA GeForce RTX 4090      WDDM  |   00000000:05:00.0 Off |                  Off |
|  0%   29C    P8             17W /  480W |       0MiB /  24564MiB |      0%      Default |
|                                         |                        |                  N/A |
+-----------------------------------------+------------------------+----------------------+

+-----------------------------------------------------------------------------------------+
| Processes:                                                                              |
|  GPU   GI   CI              PID   Type   Process name                        GPU Memory |
|        ID   ID                                                               Usage      |
|=========================================================================================|pytorch 中使用 cuda
uv 安装 pytorch
先创建 python 虚拟环境。我这里推荐使用 uv 来管理(查看pypi镜像设置)虚拟环境
如果没有项目, 可以用 uv 创建一个。
bash
uv init study-pytorch
cd study-pytorch

# 创建虚拟环境
uv venv
# 按需激活
# .\.venv\Scripts\activateuv 项目增加带 cuda 的 pytorch,在 pyproject.toml 增加如下内容:
toml
[tool.uv.sources]
torch = [
  { index = "pytorch-cu126", marker = "sys_platform == 'linux' or sys_platform == 'win32'" },
]
torchaudio = [
  { index = "pytorch-cu126", marker = "sys_platform == 'linux' or sys_platform == 'win32'" },
]
torchvision = [
  { index = "pytorch-cu126", marker = "sys_platform == 'linux' or sys_platform == 'win32'" },
]

[[tool.uv.index]]
name = "pytorch-cu126"
#url = "https://download.pytorch.org/whl/cu126"
# 南京大学 pytorch 镜像
url = "https://mirror.nju.edu.cn/pytorch/whl/cu126"
explicit = true用 uv 添加依赖
bash
# pytorch 官网下载可能比较慢,我的环境需要 1.5 小时。
# 使用南京大学 pytorch 镜像很快
uv add torch torchaudio torchvision

# 安装好后可以查包
uv pip list
# 或
uv tree备注
- 带 cuda 的 pytorch,有哪些版本,pypi的地址是多少?请参考 pytorch 的 get-started
- 指定 sources 参考 uv 官方的说明:Using uv with PyTorch
- 如果 不想创建 pyproject.toml 文件,只用 uv pip 的功能。可以用如下方式安装:
bash
# cd 到一个目录,如:
# cd ~/study-pytorch

# uv 创建虚拟环境
# 创建 .venv 子目录
# 可以加 -p 3.x 参数指定 python 的版本
# uv venv -p 3.11
uv venv

# 指定 pypi 源的地址下载
# https://download.pytorch.org/whl/cu126
# 南京大学 pytorch 镜像
# https://mirror.nju.edu.cn/pytorch/whl/cu126
uv pip install torch torchvision torchaudio --index https://mirror.nju.edu.cn/pytorch/whl/cu126验证 pytorch with cuda
如下代码可以放到 check_cuda.py
python
import torch

# 检查 PyTorch 是否支持 CUDA
print("CUDA available: ", torch.cuda.is_available())

# 如果 CUDA 可用,打印设备信息
if torch.cuda.is_available():
    print("CUDA Device Count: ", torch.cuda.device_count())
    print("CUDA Current Device: ", torch.cuda.current_device())
    print("CUDA Device Name: ", torch.cuda.get_device_name(torch.cuda.current_device()))
    print("CUDA Device Properties: ", torch.cuda.get_device_properties(torch.cuda.current_device()))

# 测试 CUDA 上的张量操作
if torch.cuda.is_available():
    tensor = torch.randn(5, 3)
    tensor = tensor.to('cuda')
print("Random tensor on CUDA: ", tensor)运行
bash
uv run python check_cuda.py

# 如 .\.venv\Scripts\activate 激活过虚拟环境,直接可以用 python 运行
# python check_cuda.py结果,如:
console
CUDA available:  True
CUDA Device Count:  2
CUDA Current Device:  0
CUDA Device Name:  NVIDIA GeForce RTX 4090
CUDA Device Properties:  _CudaDeviceProperties(name='NVIDIA GeForce RTX 4090', major=8, minor=9, total_memory=24563MB, multi_processor_count=128, uuid=c522954a-xxx-529b-aa8c-xxx, L2_cache_size=72MB)
Random tensor on CUDA:  tensor([[ 0.6963,  0.9916, -0.7688],
        [ 3.0599, -0.4634,  0.0474],
        [-0.9436,  1.0714,  0.9171],
        [-0.3856, -1.3856,  0.4898],
        [-0.8716,  0.6349, -2.2697]], device='cuda:0')