Poetry : 一个 Python 依赖 和 打包管理工具
介绍
在 Python 项目中,通常需要:创建虚拟环境;依赖管理;打包发布。这些功能分别由三个相关工具执行。
- venv - 创建虚拟环境
- pip - 管理依赖:下载、安装。
- setuptools - 打包和发布包。
poetry 提供了三合一的解决方案。
Poetry 安装
brew install poetry

# 安装后 直接有 poetry 命令,它放到 /usr/local/bin/poetry
# ll /usr/local/bin/poetry*
# lrwxr-xr-x 1 chenlb wheel 33 10 19 22:50 /usr/local/bin/poetry -> ../Cellar/poetry/1.8.4/bin/poetry# 推荐先创建一个 poetry 专用的虚拟环境。
# 如:使用 ~/.poetry 作为 poetry 的主目录。
python3 -m venv ~/.poetry
# .poetry 环境的 pip 更新最新的 pip 和 setuptools
~/.poetry/bin/pip install -U pip setuptools
# .poetry 环境的 pip 安装 poetry
~/.poetry/bin/pip install poetry
# 安装后在 ~/.poetry/bin/poetry,把它连接到 /usr/local/bin/poetry
ln -s ~/.poetry/bin/poetry /usr/local/bin/poetry
# 可以直接使用,查看版本
poetry -V
# 输出:Poetry (version 1.8.4)查看 Poetry 官网更多的安装方式,其它有点复杂。
使用 Poetry
创建新的项目
使用 poetry 创建新的项目
# 在 ~/Pojects 目录中创建,创建新的项目 demo-poetry
poetry new demo-poetry

# 输出:
# Created package demo_poetry in demo-poetry

# 查看目录结构。没有 tree 命令,使用 brew install tree 安装。
tree demo-poetry目录结构:
demo-poetry
├── README.md
├── demo_poetry
│   └── __init__.py
├── pyproject.toml
└── tests
    └── __init__.py

3 directories, 4 files主要是 pyproject.toml 文件
指定 PyPI 源
poetry 还不支持 ~/.pip/pip.conf 文件配置,因此全局 PyPI 国内镜像源需要每个 pyproject.toml 文件配置。
在 pyproject.toml 增加如下内容:
[[tool.poetry.source]]
name = "ustc-pypi"
url = "https://mirrors.ustc.edu.cn/pypi/simple"
# primary 表示主镜像源
priority = "primary"

[[tool.poetry.source]]
name = "aliyun-pypi"
url = "http://mirrors.aliyun.com/pypi/simple/"
# supplemental 表示备镜像源
priority = "supplemental"安装依赖包
# 进入项目目录
cd demo-poetry

# 安装 requests 包
poetry add requests输出:
Using version ^2.32.3 for requests

Updating dependencies
Resolving dependencies... (5.3s)

Package operations: 5 installs, 0 updates, 0 removals

  - Installing certifi (2024.8.30)
  - Installing charset-normalizer (3.4.0)
  - Installing idna (3.10)
  - Installing urllib3 (2.2.3)
  - Installing requests (2.32.3)

Writing lock filepyproject.toml 配置文件里加了一条 requests 依赖记录。也会生成一个 poetry.lock 文件。
现在完整的 pyproject.toml 内容如下:
[tool.poetry]
name = "demo-poetry"
version = "0.1.0"
description = ""
authors = ["chenlb <chenlb2008@gmail.com>"]
readme = "README.md"

[tool.poetry.dependencies]
python = "^3.13"
requests = "^2.32.3"


[[tool.poetry.source]]
name = "ustc-pypi"
url = "https://mirrors.ustc.edu.cn/pypi/simple"
priority = "primary"

[[tool.poetry.source]]
name = "aliyun-pypi"
url = "http://mirrors.aliyun.com/pypi/simple/"
priority = "supplemental"

[build-system]
requires = ["poetry-core"]
build-backend = "poetry.core.masonry.api"说明:
也可以在 [tool.poetry.dependencies] 下面,手动增加依赖包描述 requests = "^2.32.3",再运行如命令进行依赖安装:
# --no-root 选项表示不安装当前项目,只安装依赖包。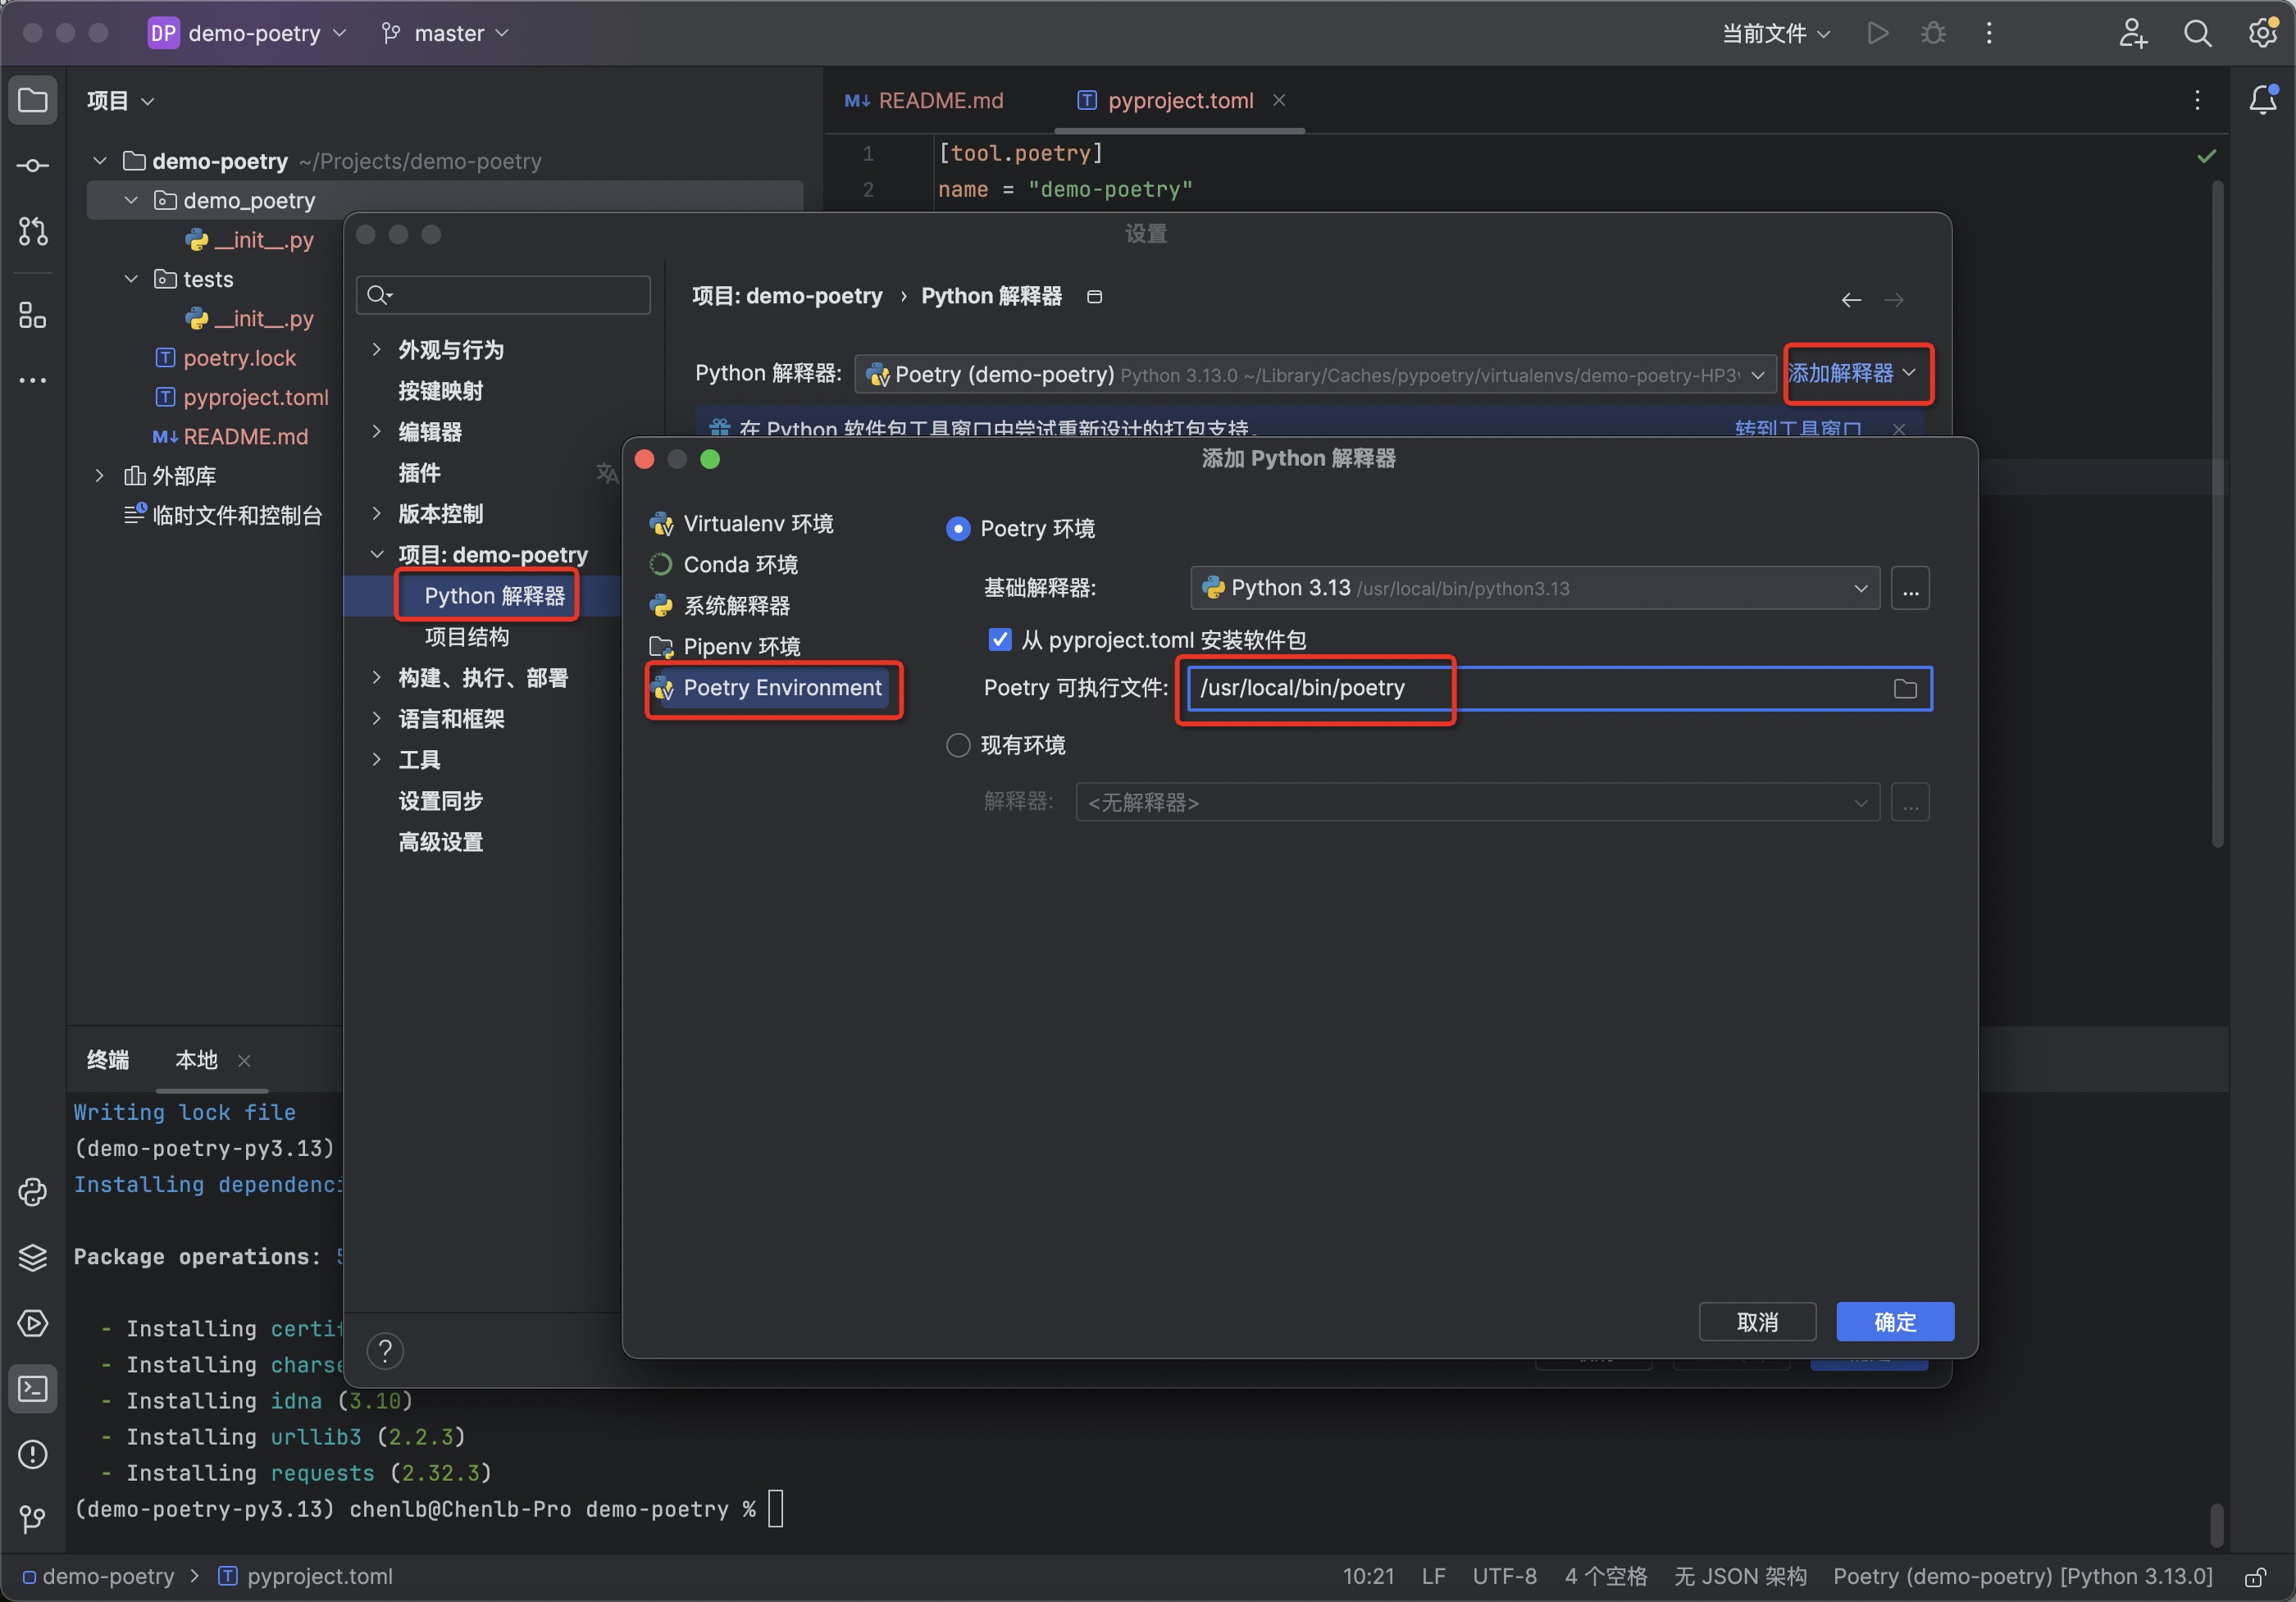
poetry install --no-rootPyCharm 中使用 Poetry
现有项目加 Poetry
现在项目改用 Poetry 来管理依赖,可以:
- 在 "Python 解释器" -> 添加解释器 -> 选择 "Poetry Environment"
- -> "Poetry 环境",可以选择基本解释器(Python 版本) -> 选择 "从 pyproject.toml 安装软件包"
- -> "Poetry 可执行文件",一般是
/usr/local/bin/poetry
PyCharm 的终端会自动激活 poetry 创建的虚拟环境。
如下图:
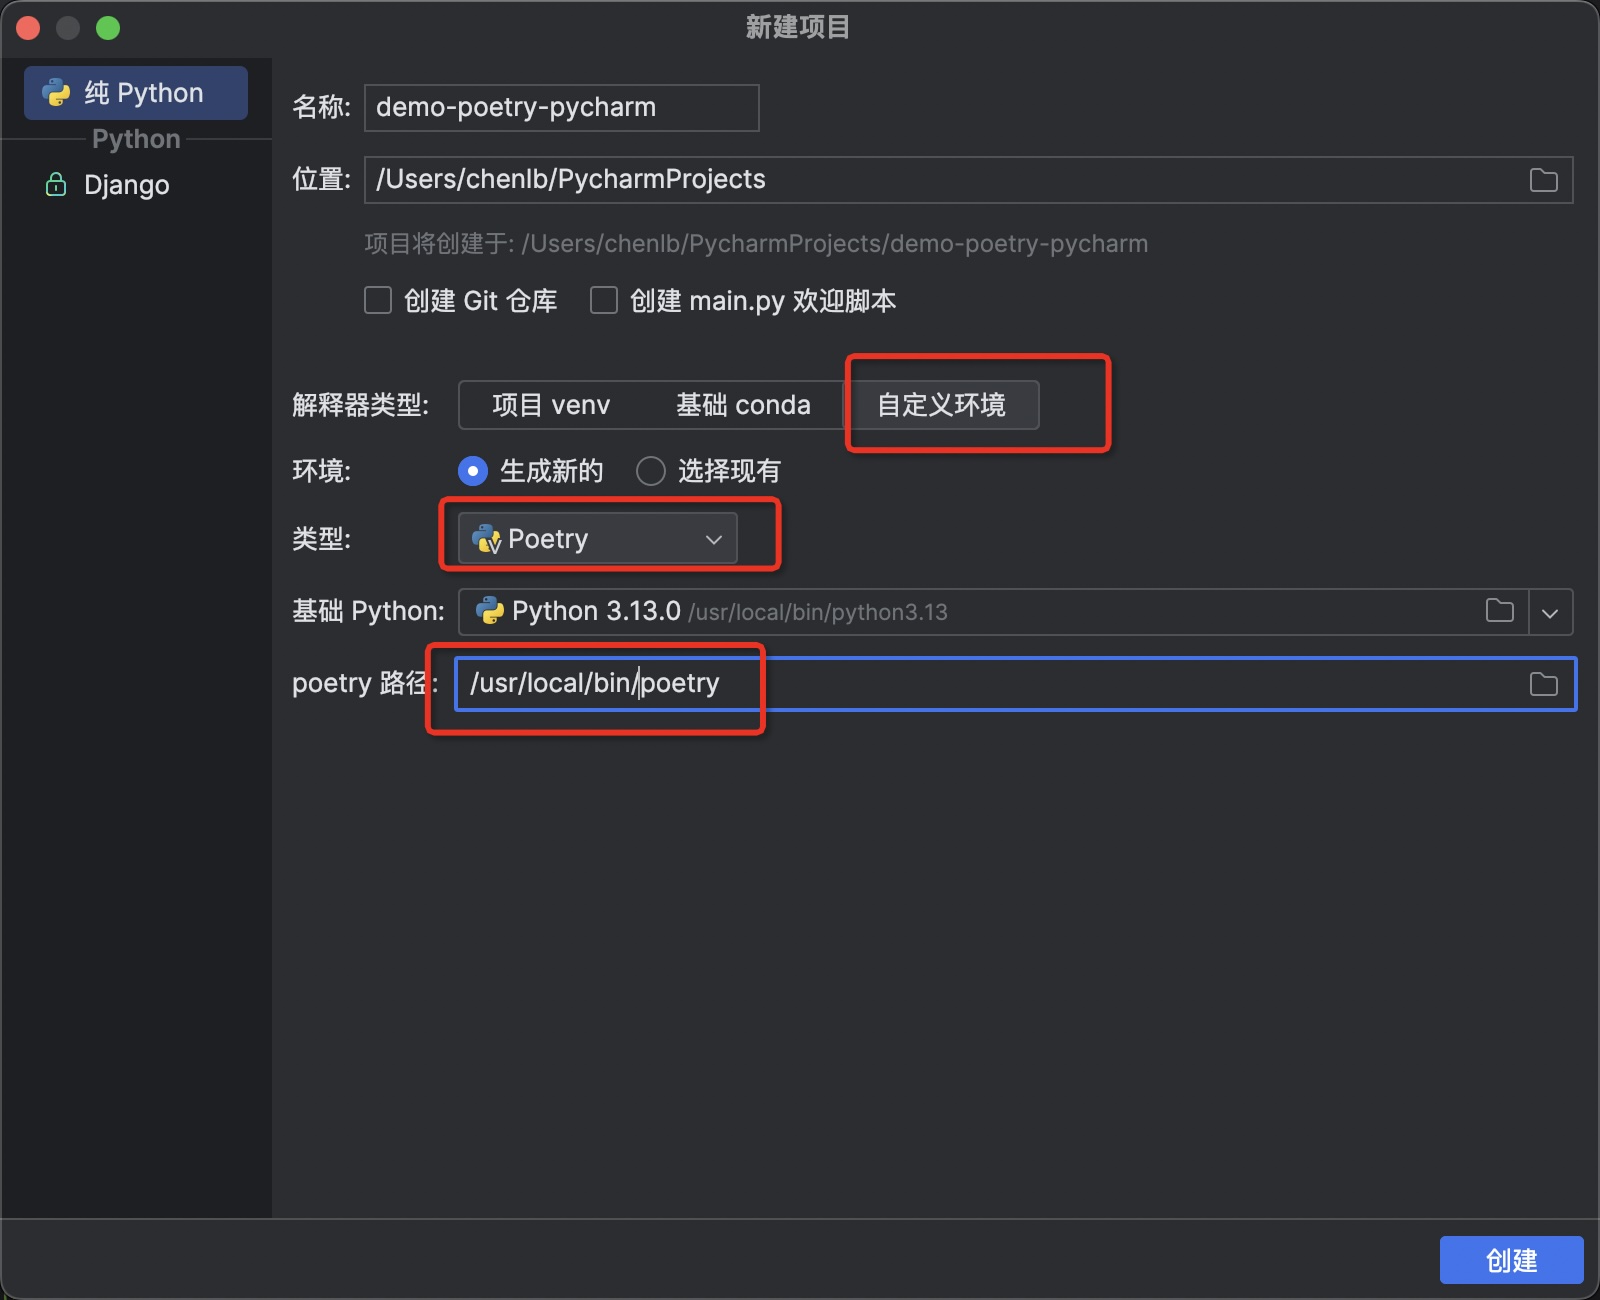
创建 Poetry 项目
创建项目时:
- 解释器类型选择 "自定义环境"
- 选择 "生成新的"
- 类型选择 "Poetry"
- poetry 路径确认下,一般是
/usr/local/bin/poetry
依赖包的版本约束
^ 表述
Caret (^) 脱字符表述
| 版本描述 | 效果 |
|---|---|
| ^1.2.3 | >=1.2.3 <2.0.0 |
| ^1.2 | >=1.2.0 <2.0.0 |
| ^1 | >=1.0.0 <2.0.0 |
| ^0.2.3 | >=0.2.3 <0.3.0 |
| ^0.0.3 | >=0.0.3 <0.0.4 |
| ^0.0 | >=0.0.0 <0.1.0 |
| ^0 | >=0.0.0 <1.0.0 |
~ 表述
Tilde (~) 波浪号表述
| 版本描述 | 效果 |
|---|---|
| ~1.2.3 | >=1.2.3 <1.3.0 |
| ~1.2 | >=1.2.0 <1.3.0 |
| ~1 | >=1.0.0 <2.0.0 |
* 表述
Wildcard (*) 通配符表述
| 版本描述 | 效果 |
|---|---|
| 1.2.* | >=1.2.0 <1.3.0 |
| 1.* | >=1.0.0 <2.0.0 |
| * | >=0.0.0 |
不相等表述
>= 1.2.0
> 1
< 2
!= 1.2.3多条件表述
>= 1.2, < 1.5精确表述
==1.2.3依赖配置
extras
比如用 uvicorn(是用 Python 实现的 ASGI Web 服务器) 的最小安装 standard。
使用 extras 属性:
# ...

[tool.poetry.dependencies]

# 有 extras 为 standard
uvicorn = {version = "^0.32.0", extras = ["standard"]}

# 手工更新依赖配置后,需要手工安装这些依赖。
# 更新 poetry.lock
# poetry lock --no-update
# 安装依赖
# poetry install --no-root

# ...# 使用 @ 分隔版本约束
poetry add "uvicorn[standard]@^0.32.0"# pip 的安装方式,带版本约束。
pip install "uvicorn[standard]>=0.32.0,<1.0.0"私有 PyPI 源的包
增加 私有 PyPI 源
[[tool.poetry.source]]
name = "my-pypi"
# 替换成自己的私有 PyPI 源
url = "http://pypi.my-xxx.com/simple/"
# explicit 表示只能 显示声明 才能使用。
priority = "explicit"使用私有 PyPI 源的包
# ...

[tool.poetry.dependencies]
# 使用 source 属性指定 私有 PyPI 源
demo-xxx = {version = "^0.0.1", source = "my-pypi"}

# ...# 使用 --source 选项指定
poetry add --source my-pypi demo-xxx@^0.0.1# -i 选项指定 私有 PyPI 源
# --trusted-host 选项指定可信 hostname
pip install "demo-xxx" -i "http://pypi.my-xxx.com/simple/" --trusted-host "pypi.my-xxx.com"运行程序
如下载一个网页的代码,demo_poetry/get_page.py:
import requests

r = requests.get('http://www.baidu.com')
# 只输出返回状态码
print(r.status_code)运行 demo_poetry/get_page.py 程序:
# 正常 python 运行前加上 poetry run
poetry run python demo_poetry/get_page.py# 先查看 poetry 生成虚拟环境的目录在哪里。
poetry env info
# 找到 Virtualenv 段落下的 Path,样子下如:
# Path: /Users/chenlb/Library/Caches/pypoetry/virtualenvs/demo-poetry-HP3vkwtJ-py3.13
# 激活虚拟环境,上面的 Path 加上 bin/activate
source /Users/chenlb/Library/Caches/pypoetry/virtualenvs/demo-poetry-HP3vkwtJ-py3.13/bin/activate
# 显示如下
# (demo-poetry-py3.13) chenlb@Chenlb-Pro demo-poetry %
# 激活虚拟环境后,项目需要的依赖就直接能找得到。
# 直接 python 运行
python demo_poetry/get_page.py发布
先体验发布(testpypi)
我以 PyPI 的 test 源来使用。
1、先 注册 test PyPI 账号,已经有账号了跳过。 2、pyproject.toml 配置 testpypi 源,增加内容如下:
[[tool.poetry.source]]
name = "testpypi"
url = "https://test.pypi.org/legacy/"
priority = "explicit"3、配置 testpypi 的访问权限
# api-token 格式如:pypi-Xxx
poetry config pypi-token.testpypi <你的 api-token># 如果 PyPI 源使用 用户名 和 密码。
# http-basic 密码:用户名 和 密码。
# 注意:testpypi 不是使用 用户名 和 密码。
poetry config pypi-token.testpypi <username> <password>4、项目包改为 test PyPI 的格式:
- 包名:
example_package_YOUR_USERNAME_HERE - pyproject.toml 的项目名,也一样是:
example_package_YOUR_USERNAME_HERE
其中 YOUR_USERNAME_HERE 是在 test PyPI 注册名,example_package 是自定义的。
比如我把上面的 demo_poetry 改为 demo_poetry_chenlb 。 看下目录结构:
demo-poetry
├── README.md
├── demo_poetry_chenlb
│   ├── __init__.py
│   └── get_page.py
├── poetry.lock
├── pyproject.toml
└── tests
└── __init__.py5、pyproject.toml 修改包版本 version,改为你想要的值。如 0.1.1
6、发布
# 选项 --build 表示,发布前构建。
# 选项 -r 或 --repository 指定私有 PyPI 源。
poetry publish -r testpypi --build输出如:
Building demo_poetry_chenlb (0.1.1)
  - Building sdist
  - Built demo_poetry_chenlb-0.1.1.tar.gz
  - Building wheel
  - Built demo_poetry_chenlb-0.1.1-py3-none-any.whl

Publishing demo_poetry_chenlb (0.1.1) to testpypi
 - Uploading demo_poetry_chenlb-0.1.1-py3-none-any.whl 100%
- Uploading demo_poetry_chenlb-0.1.1.tar.gz 100%现在可以打开地址:https://test.pypi.org/project/demo_poetry_chenlb/ 看到内容了。
正式发布
参考:How To Publish Python Packages to PyPI using Poetry on Ubuntu 22.04
说明
1、不需要在 pyproject.toml 指定源
2、包名不需要加 *_YOUR_USERNAME_HERE。按自己定义的来。但建议不跟其它 pypi 冲突。
3、配置 api-token
# api-token 格式如:pypi-Xxx
poetry config pypi-token.pypi <你的 api-token>4、发布时不需要指定源。直接:
poetry publish
# 或带上 --build
# poetry publish --build发布示例(langfarm-python-sdk):
- 成功:不需要指定 pypi 源
- 失败:多余地指定 pypi 源
(langfarm-py3.11) chenlb@Chenlb-Pro langfarm % poetry publish --build
There are 2 files ready for publishing. Build anyway? (yes/no) [no] yes
Building langfarm (0.1.0)
  - Building sdist
  - Built langfarm-0.1.0.tar.gz
  - Building wheel
  - Built langfarm-0.1.0-py3-none-any.whl

Publishing langfarm (0.1.0) to PyPI
 - Uploading langfarm-0.1.0-py3-none-any.whl 100%
- Uploading langfarm-0.1.0.tar.gz 100%(langfarm-py3.11) chenlb@Chenlb-Pro langfarm % poetry publish -r pypi --build
Building langfarm (0.1.0)
- Building sdist
- Built langfarm-0.1.0.tar.gz
- Building wheel
- Built langfarm-0.1.0-py3-none-any.whl
Repository pypi is not defined参考资源
Poetry 官方说明文档: